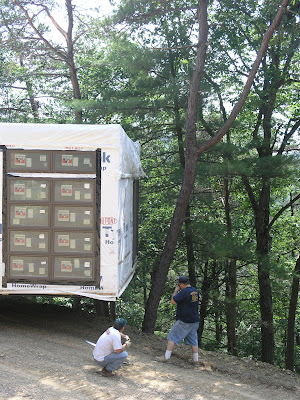
After a long day of work on Thursday, the house made it to the top of the hill. First they got the panels set:
Then they started pulling the house:
Then we got stuck at the corner:
Finally, after some fraught moments, we got around the turn and up the hill:
We left the house on the high side of the foundation and the crane will pick it from there:
That was supposed to happen this morning, but it rained all night and morning so we called it off. We pay for the crane by the hour, and the better the conditions, the faster it'll go. Back out Monday for the pick and set.
Friday, June 29, 2007
Wednesday, June 27, 2007
Foundation issues
There are a bunch of inconsistencies b/w the engineered drawings and the as-built version of the foundation. They are not dealbreakers (the dimensions are correct, and it's square), but it's disappointing that the contractor didn't follow the plans and that I didn't catch them.
This is going to get technical (and boring unless you are really interested in the nuts and bolts of this process). After Res4 designs the house, they have a third-party engineer draw structural details to comply with applicable code (no code in Hardy County, WV, but most builders build to BOCA; I don't actually know what code the engineers drew to in our case). The engineers look at shear and lift concerns and make sure the house is up to snuff. With our house, the connections to the foundation present some lift issues (how to keep the house connected to the foundation when wind wants to lift it off). So the engineered plans specify the kinds of connections that are required b/w the house and the foundation: a combination of anchor bolts (which connect the sill plate - the lumber cap on the foundation - to the concrete wall) and straps (which connect the house to the foundation) and other anchor bolts (also house to foundation), the precise deployment of which varies depending on which specific materials the builder uses. In our case, for example, the engineered drawings offer four different sets of specs (specifying frequency and distance) for the anchor bolts to the sill depending on which kind of bolts are used. The anchor bolts for the sill and the corner straps specified on one of the short walls of our house needed to be located and set in the wet concrete of the foundation wall during the pour. Some of the anchor bolts were missed, and the straps were not set.
Res4 noticed this in the pictures I posted on the blog (another great reason for blogging this process - your architect can monitor progress remotely) and contacted me to talk about implications and possible fixes. Most importantly, structurally the house will be fine. We can compensate for the missed straps in the foundation by increasing the number of straps on the exterior (connecting house to foundation). If there were an inspection process, it would probably be a bigger deal - new engineered plans might be req'd and we'd have to wait for approval.
After talking with Res4, I talked with the contractor who is managing the pre-set and set phases for us. His position was that the connections all exceed BOCA (which is what he builds to) and they've already gone above and beyond what is necessary; in his words, "it'd take a hurricane to move this house." That, of course, is not an acceptable answer for deviating from the plans without talking to me, and I told him as much. We talked about the strapping that Res4 recommended as a solution. He said we could do what we want but it's fine as is.
Lots of lessons here. First, as difficult as it is to get your arms around the technical specs of the building process, learn as much as you can. I probably didn't do enough to educate myself about the particular details of the engineered drawings (I knew there were connections called for at the corners, and didn't know better that the anchor bolts the contractor used weren't those called for on the plans). At some point you're trusting your builder, and this is probably one of those areas, so choose well. (This is also one of the areas where prefab becomes a factor - I've got a builder I don't necessarily love and I'm not there as much as I'd like to be, but I'm not relying on him to do nearly as much as if he were building a whole house for me.) Review as much of the technical specs as you have the stomach for with as many people as you can. I'm sure Res4 would tell you that I've asked more questions than they usually get, but there are still so many things that I don't know.
Second, there's a HUGE difference b/w drawing a house and building a house. There's a lot of standard building practice that isn't done exactly as an architect or an engineer would have it done, and at the same time there's a lot of sloppy building. It's nice for me right now to have Res4 to fall back on for a little more perspective on which is which.
Instead of sleeping in our house last night...
...we slept here:
(Notice the oversize rainfly - no repeat of our flood of last week!)
To make a very long story short, the hitch for the bulldozer to pull the house up the hill was woefully inadequate for the job. EVERYONE should have known this beforehand, and there's no excuse for it to have been discovered the morning of the set. But we're resheduled for Friday. Tomorrow we'll pull the house up the hill.
UPDATE: Of course it's POURING RAIN in WV right now, so we'll see.
Tuesday, June 26, 2007
Cross your fingers
We're off this morning for the set. Had a bit of rain last night, but hopefully shouldn't be a problem. Lot's of pics soon.
Res4 notes some inconsistencies b/t the engineered drawings and the actual foundation pour - we'll have to review those with the contractor today and see what sort of problems they present.
Saturday, June 23, 2007
Cedar Siding
So we spent all day Thursday sanding cedar boards. We've got 5200' linear feet of 1"x4"x random length (from 6' to 20') tongue and groove clear (no knots) grade A cedar. It is gorgeous. The range of colors is striking, from blonde to deep red. (The cedar was $6600, shipping included, about $1.28/lf.) Here's our staging area:
We're using Sikkens Cetol SRD (color: natural #078; DO NOT choose the wrong color - the "cedar" color apparently turns the wood orange!), which is an oil based translucent stain that really just deepens the natural color of the wood and highlights the grain. Res4 recommends it; they've used it on lots of their homes. It costs about $30/gallon (we should use b/t 8-10 gallons). The application process requires that you sand the exterior side of the wood to a rough grit (80-100) and then apply liberally, brushing back any excess (the interior side of the wood needs a coat as well, as does each of the tongues and each of the grooves). We've sanded about half the cedar so far, and here are some boards with the stain:
Our estimate from the contractor for installation of our cedar siding was $13k (and I think it would have been higher if we'd talked through the specific details of the sanding and staining process). So we're going to save b/t $5-6k doing it ourselves, assuming all goes well.
Friday, June 22, 2007
Basement Slab and Radiant Installation
The walls are up and the slab is in. The only glitch here was the faux brick on the outside walls - not a big deal at all because we planned on parging them (a stucco-like application). But the bare concrete look is one we really like and I was thinking if it turned out ok we'd just leave it like that. But I never talked about that with the concrete guys, and the faux brick forms are SOP for them, so that's that.
The wall I was worried about turned out fine:
This is an insulation product designed for radiant installations called RAZ panels. They are 2'x4' styrofoam boards with dimples through which you run PEX loops. Our PEX is 1/2" and these boards are designed to accomodate that size. They aren't cheap ($16/panel - we needed 110), but they really made the installation of the PEX easy (no tying it to rebar) and they are supposed to be a pretty efficient way to reduce heat loss from the radiant to the ground.
PEX is supposed to be a godsend for plumbing, and I understand that new construction often gets plumbed only with PEX runs (no soldering, no joints, fewer leaks, hardly ever cracks even when the water inside freezes). But it's stiff and not the easiest stuff to run through these dimples. It came in 500' foot rolls about the dimension of a roll of garden hose (1500' for about $700). And it didn't want to give up that shape. And if you force it you can kink it, so you have to be patient. Here's what the installation of the PEX looked like:
If a professional were doing this installation, the manifold would be installed at this point in a box just like the one you see for the tub rough in (there are five loops, and the intention is that they will be able to run independent of one another). But since Craig and I are doing it ourselves and our HVAC sub will install the mechanical elements later on, this is the best we could do (this spot where all the rough plumbing and PEX pop up is where the bathroom and mechanical room abut):
Here's our concrete pour. This is 4000 lb concrete (as requested by the concrete polisher) and is reinforced with tiny strands of fiberglass, which means we don't need rebar or expansion joints (each strand of fiberglass encourages microcracks as opposed to the larger breaks you can get when a rebar slab expands and contracts). The heavier concrete with the fiberglass ended up costing just under $1k more than what we'd originally spec'd (3000 lb with rebar) but should result in a better slab.
The concrete polisher also requested that we use a mechanical trowel to finish the pour (reduces air pockets):
This is the exterior waterproofing for the foundation - DeltaMS. Once upon a time everybody used tar, then Thoroseal became pretty popular. We brushed four feet of Thoroseal on the bottom half of the walls. But I understand that with poured concrete, if the wall cracks so does the Thoroseal. So we were looking for a redundant waterproofing application, and these days there are lots of rubber membrane applications available. The difference with the product we're using is that it has dimples on the side of the membrane that faces the wall. This reduces the capillary effect of a membrane flush with the wall, and allows any water that does get in to flow down to the drain pipes. The installation went pretty quickly and the two 65' rolls and the necessary hardware (fasteners, flashing) came to about $700.
The guy in the middle here it Butch. 6'10, 340 lbs. Nice to have a guy like that around on any job site.
Here's the only real mishap of the day. This is a pic of the concrete guy wondering where in the world this (parked) pickup came from:
The wall I was worried about turned out fine:
This is an insulation product designed for radiant installations called RAZ panels. They are 2'x4' styrofoam boards with dimples through which you run PEX loops. Our PEX is 1/2" and these boards are designed to accomodate that size. They aren't cheap ($16/panel - we needed 110), but they really made the installation of the PEX easy (no tying it to rebar) and they are supposed to be a pretty efficient way to reduce heat loss from the radiant to the ground.
PEX is supposed to be a godsend for plumbing, and I understand that new construction often gets plumbed only with PEX runs (no soldering, no joints, fewer leaks, hardly ever cracks even when the water inside freezes). But it's stiff and not the easiest stuff to run through these dimples. It came in 500' foot rolls about the dimension of a roll of garden hose (1500' for about $700). And it didn't want to give up that shape. And if you force it you can kink it, so you have to be patient. Here's what the installation of the PEX looked like:
If a professional were doing this installation, the manifold would be installed at this point in a box just like the one you see for the tub rough in (there are five loops, and the intention is that they will be able to run independent of one another). But since Craig and I are doing it ourselves and our HVAC sub will install the mechanical elements later on, this is the best we could do (this spot where all the rough plumbing and PEX pop up is where the bathroom and mechanical room abut):
Here's our concrete pour. This is 4000 lb concrete (as requested by the concrete polisher) and is reinforced with tiny strands of fiberglass, which means we don't need rebar or expansion joints (each strand of fiberglass encourages microcracks as opposed to the larger breaks you can get when a rebar slab expands and contracts). The heavier concrete with the fiberglass ended up costing just under $1k more than what we'd originally spec'd (3000 lb with rebar) but should result in a better slab.
The concrete polisher also requested that we use a mechanical trowel to finish the pour (reduces air pockets):
This is the exterior waterproofing for the foundation - DeltaMS. Once upon a time everybody used tar, then Thoroseal became pretty popular. We brushed four feet of Thoroseal on the bottom half of the walls. But I understand that with poured concrete, if the wall cracks so does the Thoroseal. So we were looking for a redundant waterproofing application, and these days there are lots of rubber membrane applications available. The difference with the product we're using is that it has dimples on the side of the membrane that faces the wall. This reduces the capillary effect of a membrane flush with the wall, and allows any water that does get in to flow down to the drain pipes. The installation went pretty quickly and the two 65' rolls and the necessary hardware (fasteners, flashing) came to about $700.
The guy in the middle here it Butch. 6'10, 340 lbs. Nice to have a guy like that around on any job site.
Here's the only real mishap of the day. This is a pic of the concrete guy wondering where in the world this (parked) pickup came from:
The Good, the Bad and the Ugly
The box wasn't at the bottom of the driveway Tuesday evening for thirty minutes before our first sightseer stopped and asked, "What is it? Is it a double wide?" Not satisfied with our answer ("A modular."), she wondered, "Which end is the front?"
Well, good news is the house made it fine. No real issues - some minor drywall cracking, a couple of window locks popped during travel that will need to be replaced (not sure exactly what will need to be replaced - Simplex will let me know). Structurally, the house came through great. Window panes are all intact, the loose materials that shipped inside the box didn't do any damage, and no water got in. Many thanks to the drivers who shepharded the box on its long journey. We still need to inventory all the loose materials that came inside. They'll need to come out before we set the house (we'll stage them in the basement).
Bad - the first truck reached the homesite before we did. It was only carrying the panelized wall. Mark, the contractor who is managing the set, didn't want to have to find room for the trailer on site (and we do have a bit of a space crunch at the moment). So he rented a small boom truck to carry the panel from the bottom of the hill to the top. Suffice it to say, the boom truck couldn't handle the panel. By the time we got there, they had already beat up the panel pretty good just getting it off the trailer. So this was the scene upon our arrival:
The only real option at this point was to cut it, which they did. A chainsaw made quick work of the panel and soon it (well, half of it) was on its way up the driveway:
Now there's no question that if he had just left it at the bottom of the hill, as we had planned, we would have just towed it up first thing on set day and had the crane place it. It would have made space even tighter than it already is (for the arriving house, the concrete, and the crane), but would have been feasible. So the first lesson there is to make sure you're present when these pieces arrive so you can say NOOOOOO when necessary. The second lesson, I guess, is about the efficacy of a panel like that when you've got difficult site issues. We already knew access might be tricky, so stick building that panel might have made more sense in hindsight.
Ugly - here are our spacious WV accommodations at the moment:
Not TOO terrible you say. Well, last night around 6 we took a break from our day of sanding cedar (more on that later) to go grab a bite. We ended up at a wonderful cafe in Moorefield (O'Neills) about thirty minutes away. It was bright and sunny when we left the site. Not by the time we finished dinner. As you may have guessed by now (particularly those clever readers who note the absence of a rain fly in the pic of our tent), our plush home away from home suffered a direct hit in the ensuing thunderstorm. Just a mess. We slept for a few hours in the house, but it kept raining and we decided to call it a week and head home. Back out bright and early Tuesday morning for the set.
...finally here
Monday, June 18, 2007
Almost here...
Saturday, June 16, 2007
All dressed up and no place to go
Kinda sad, actually:
And not knowing too much about the nuts and bolts of pouring a foundation, this view is downright scary:
It's straight where the form meets the footer; I think this bowing is just from the 2x4s that are bracing it right now.
UPDATE: Mystery solved? With the help of Res4's engineering consultant (thanks Greg), we guess that the rain at the end of the last week added some pressure/moved the 2x4 braces on the uphill side of the foundation forms, causing the top of the forms to bow. Easy to fix by rebracing on Monday.
Friday, June 15, 2007
Argh
No foundation yet. We've been having some very unusual weather here in the DC area since the beginning of the week - a low pressure system over the Bay of Maine and a high pressure system over the Great Lakes meant that our weather was coming from the northeast, and most of that weather has been showers and thunderstorms. Short version: our road is a muddy mess and the concrete truck can't get to the top of the hill. So right now we're on for Monday to pour the walls. Not the end of the world. But I've got the house coming on Wednesday and no place to put it (concrete won't have cured yet). Set is tentatively rescheduled for Monday, June 23d.
My brother Craig and I were out at the site yesterday (we left home before we heard that the pour was cancelled). We spent some time working on the huge log pile at the top of the hill; we're going to have firewood for YEARS.
I'll be at the Simplex factory this coming Monday morning for our walk-through inspection; I'll take lots of pics.
Wednesday, June 13, 2007
Weather
Well how's this for a weather delay: a tornado (!) and over an inch of rain have conspired to delay the pouring of the foundation walls until tomorrow. The tornado went through Moorefield, WV, last night, which is the biggest town near our house and where most of the trades are located. Sounds like everybody's ok, at least.
As for the rain, there's no point trying to get a concrete truck up our driveway when it's wet (it hasn't been gravelled yet). So tomorrow...
Monday, June 11, 2007
Friday, June 08, 2007
Nice Surprise
The well drilling folks called this morning and asked if they could drill our well today. I said yes. Don't know if they did or not, but it sure would be nice to have water when the house gets here (electric too, but that seems like a long shot).
Budget Numbers
I've posted some updated budget numbers over at APrefabProjectBudget (there's a permanent link to that page on the left bar). Let me know if you see any glaring errors or have questions - lostrivermodern AT gmail DOT com.
Thursday, June 07, 2007
Schedule, revised
Here's our new (optimistic) schedule - praying it stays dry:
Tomorrow, June 8: Pour footers; Res4 walk-through inspection of finished house in factory;
Wednesday, June 13: Pour walls;
Thursday, June 14: Pour slab;
Monday, June 18: Bring utilities up driveway;
Wednesday, June 20: House delivered;
Thursday, June 21: House set.
Today the concrete guys set the forms for the footers. The forms double as the drain pipes (the perforations let water in and funnel it to away from the foundation). Because we'll have a walk-out basement, the downhill footer is set lower than the other three walls (to get under the frostline). The foundation walls will rise three feet above the uphill grade, and then we'll backfill. The pad to the right (the downhill side) is where the crane will park; it'll be returned to its original grade, so the ground below the walk-out wall will also be about three feet higher at the end of the day than it appears right now.
No Stone Throwing Please
Everybody's got their own design aesthetic, and as they say, there's no accounting for other people's taste. But here's mine:
Don't know if I'm fastidious enough to do it right, but that's my ideal. Probably not til the kids are out of the house, though...
Tuesday, June 05, 2007
Ninjas fight ALL the time
The videos on Res4's site of the Dwell House have apparently gone viral. And the architecturally savvy ninjas at MyNinjaPlease are impressed.
Jetson Green wonders about the presentation. I think they're great, and I think the music is outrageously cool, but I know something he does not know: Claudia Tanney, the producer of the second and third videos, was about twelve years old when she put them together. I, at 32, just learned how to use blogger.
Sunday, June 03, 2007
Contractors
Everybody knows somebody who's had some major house project done by a contractor that turned into a train wreck. We've got a neighbor right now who's going into month thirteen of a six month addition; her stories are just absurd. We knew from the get-go that this was one of the really attractive upsides of prefab for us; particularly because our home site is a couple of hours away, the idea of not having to supervise/nag a GC to get this done was a huge advantage of the Res4 version of prefab (a 95% completed box), even if it hadn't been any cheaper. And having a (little) bit of DIY experience, the idea of finishing as much as we can ourselves really means that we're in control of the timeline and the costs. But there are some things that you just have to have other people do (like build a quarter-mile long driveway and pour the foundation) and that are not in your control. And even when things are going fine there's just a little bit of insecurity about how the next thing's gonna go.
So our working relationship with our contractors (an excavator and a GC, though we're not using him as a GC) has been pretty good so far; I don't have any real complaints. But I am struggling with a creeping anxiety that I'm sure most clients must face at one time or another: that our project is slipping from the consciousnesses of our contractors and that, try as I might, I cannot will them to put our job first. Now in our particular case it's pretty understandable; ours is admittedly a small potatoes kind of job. Our excavator is currently building the road for a 1400 acre subdivision ten minutes or so from our place, and the GC is building million dollar homes in that same subdivision. The excavator worked hard to get our road in; the only thing we're waiting on from him is the utilities ditch and conduits (and electric isn't essential at this point anyway). We haven't yet even engaged the GC to do anything other than the foundation and the set, and he's been available to me for all sorts of questions and coordination issues. But we're two weeks out from the set and I don't have total confidence that we're going to be ready (and really all that entails is the foundation being poured properly). I'm sure all modular projects, by their nature, have a ratcheting of anxiety as the set date nears, and mine will increase accordingly.
This anxiety is not really grounded in anything in particular at the moment; it's just that feeling of not being in control of a process that I'm not real savvy about in the first place that gnaws at me (as much as you read and learn, how confident can you be that your foundation's concrete doesn't have too much air/water in it?). And I'm not even a control freak. But like everybody else I want to get precise answers to my questions and have calls returned promptly and have people show up when they say they're going to. And of course it's a reality of working with contractors and trades that those things don't always happen. One thing prefab means, for me, is that there's much less of this anxiety than there could otherwise be.
Rough Schedule
So this is what we look like right now:
Week of June 4: Dig footers, excavate utility trench, order cedar siding; factory finishes box;
Week of June 11: Pour foundation, walk-through inspection of box at factory, my brother Craig arrives for the summer to help the finishing of the basement;
Week of June 18: Box arrives and is set. Anybody want to come?
We'll see how close we can stick to this. I've got a lot to blog about the prep process that's going on right now for the rest of the work we have to do, and some of the difficult parts of this process and managing it ourselves. But more on that later.
Utilities
We knew all along that we wanted to have our utilities buried if it was feasible as opposed to having power poles run up through the property to the house. We had no idea what it would cost. But the power company got back to us last week and we seem to be all set. Because the nearest existing pole is across the street behind the neighbors house, we had to get an easement from her to bring the line from her backyard to the street and the entrance of our driveway, which she generously granted us (thank you, Mrs. Gates!). Then our excavator will run a ditch up the middle of the driveway, burying two conduits - one for electric and one for telephone - at opposite sides of the ditch a couple of feet apart. The conduits have a nylon cable in them already, so when the electric company is all set they simply attach their electric cable to the nylon rope at the bottom and then go up to the top and pull it up. Because our driveway is so long, they actually can only pull it about halfway at one time, so they do it in stages. The total distance of the new utility line will be about 1600'; the power company gives us the first 600' free and then we pay $1.50/ft the rest of the way. That's another 1000' for us to get up to the transformer location, so the bill from the electric company (which came in the mail already!) is about $1500. That's in addition to the cost of the ditch and the conduit from the excavator, so all together we're at about $7500 for the underground utilities. Seems like a lot just to avoid having poles going up through the property. But the power company wouldn't go up the driveway; they'd only do a straight line to the house, so that would've meant another big clearing of the trees and we didn't want that. And it also means that should we ever subdivide or build more houses, we can run a shorter underground conduit to the next site for a pretty modest marginal cost.
Subscribe to:
Posts (Atom)